
If you don’t have a box of frozen puff pastry in your freezer, run out and get one. A box of puff pastry is the key to an easy and elegant meal that is perfect for entertaining or treating yourself.
It can be used for both savory and sweet tarts and you can make them large enough to feed a crowd or small individual ones so everyone gets their own.
I am a sucker for any kind of tart and especially an individual tart. It is the kind of thing that if I see it on the menu at a restaurant, I order it. It is crunchy and buttery with a luscious interior and always feels like something special.
I love making individual tarts, because each one is framed by the crispy multi-layered puff pastry—not only does it look good, but everyone gets their own perfect bite.
Mini-tarts like tartines—open faced sandwiches—can hold any of your favorite toppings. That means besides the mushroom tarts, you can make tarts with just about anything. My favorites include smoked salmon, almost any vegetable, and fruit and cheese.
If you haven’t used puff pastry before you will be surprised at how easy it is and how little filling you need to make a perfect tart.
When I’m feeling ambitious, I will make a cooked filling like duxelles or chunky, boozy apples and layer the cooked filling with slices of the same ingredient.
When I am short on time, I assemble the ingredients like I’ve done here. This could be cheese plus any number of vegetables like mushrooms and asparagus, or fruit like apples and pears.
For today’s tart, I took my favorite pear and blue cheese salad and deconstructed it. This tart is basically puff pastry, plus three ingredients with a little butter, and fresh thyme so the best quality of each of the ingredients is essential.
Because my goal was to make a super simple tart, I wanted to use ingredients that would bake to create a homogeneous filling and taste a little custardy without making a custard. The key to this is using a soft, creamy cheese with a brie-like texture. I chose the mild triple-creme Bleu from Fromager d’Affinois. It bakes beautifully and has a special affinity with pears.
The quality of pears vary every time you buy them, depending on ripeness. For this reason, I did something unconventional. I purchased a can of pears in heavy syrup. I have never bought canned pears before, but I tried this tart with both fresh and canned, and the canned ones are just as delicious in this tart. Plus, they are even easier to use, since they are already cored and peeled. Whether you use fresh or canned, make sure they are sliced thinly and coated with melted butter before you assemble the tarts.
Finally, roasty-toasty walnuts are the third piece of this perfect pear tart. I love darkly toasted nuts of all kinds and I use raw (untoasted) walnuts because they get very brown baking on top of the tart. If you don’t like deeply browned walnuts, add them as soon as the tarts come out of the oven.
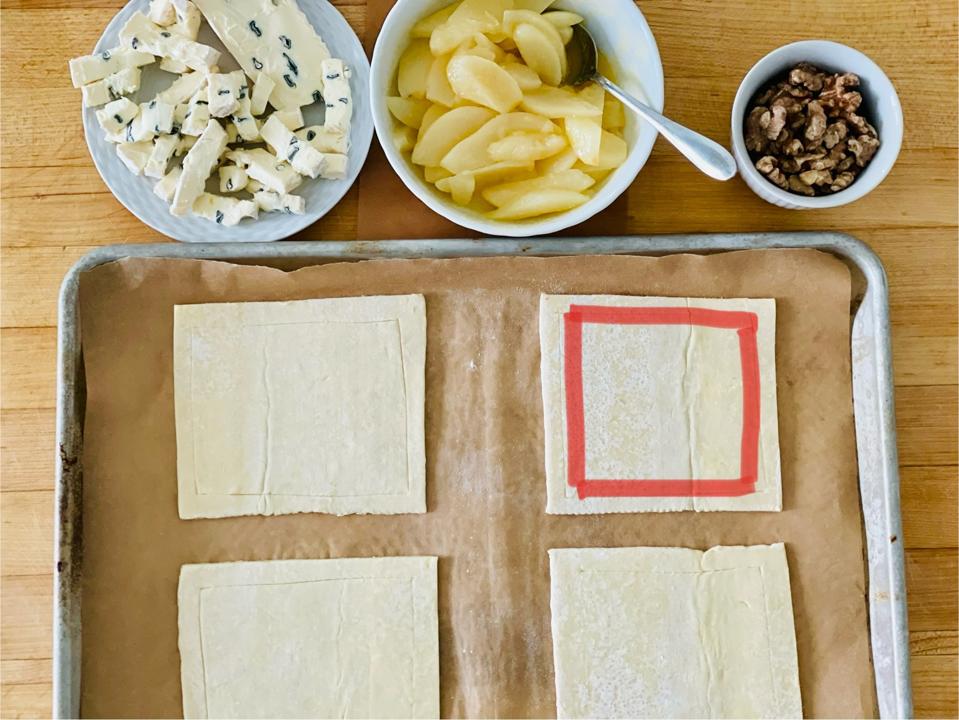
To “score” the pastry, draw a line a half-inch in from the ends with the tip of a paring knife to … [+]
The scored lines become the frame of the tart as they bake. The red marker in the photo above highlights the area that is scored for anyone unfamiliar with puff pastry.
The fun thing about using puff pastry is that as it bakes, the scored and exposed sides puff up to frame the filling. If you haven’t used puff pastry before, you might be unfamiliar with how to score it to make this happen.
The easiest way to do this is to draw a line lightly through the puff pastry with the tip of a paring knife. Do not cut all the way through or it will bake-apart from the rest of the tart
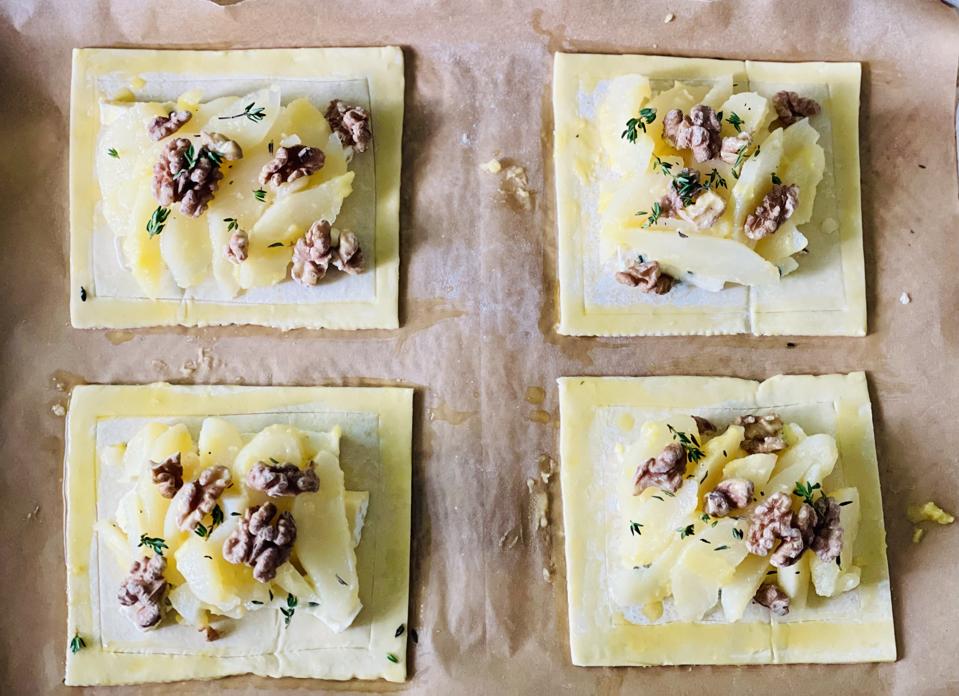
The tarts are filled—inside the lines—and ready for the oven.
And, don’t worry if the lines are not completely straight. They will bake up just fine as mine did. Just remember to fill only the space inside the lines! This is one time that you can’t “color” outside the lines because the pastry border needs the hot air to lift it up, and if anything is weighing it down, it won’t puff up. And, keep your pastry cold. It will bake better and higher if it is cold when it goes into the oven.
To make sure that it is cold before baking, cut the puff pastry, score it, and place it back in the fridge (or even the freezer) for a few minutes while you prepare the rest of the ingredients.
To assemble the tarts, place the cheese on the bottom of your dough first towards the middle. It will distribute itself evenly as it melts and bakes. Place the butter-coated pear slices on top of the cheese and finish with the walnuts. You could also chill the tarts at this point, if you aren’t ready to bake them yet.
When you are ready to bake, make sure to preheat the oven and only place the cold-pastry tarts in a completely pre-heated oven.
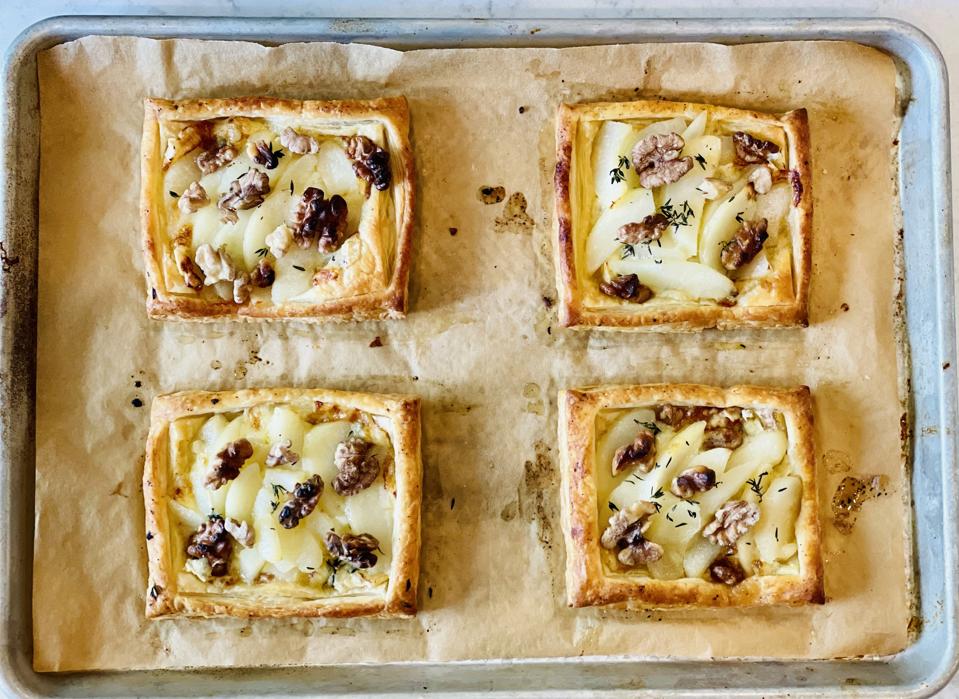
Cooked tarts cooling on a sheet pan.
Pear, Blue Cheese and Walnut Tarts
This easy tart can be served as an appetizer or with a simple green salad as a light lunch or dinner. If you don’t like blue cheese, substitute your favorite brie cheese. If you love blue cheese and want a stronger blue cheese flavor use half Roquefort and half brie cheese.
Makes 4 tarts
1 sheet Pepperidge Farm or Dufour Puff Pastry Sheets, thawed in the refrigerator
All-purpose flour, for rolling out the puff pastry
Filling:
2 pears, sliced thin or 1 14.5 ounce can pear slices packed in syrup
2 tablespoons unsalted butter, melted
Kosher salt
½ cup walnut halves
4 ounces Fromager d’Affinois blue cheese or other mild and creamy brie-like Blue cheese
1 teaspoon fresh thyme leaves, plus 1 teaspoon for garnish (optional)
Special equipment: Silicone baking mat or parchment paper
1. Roll out the pastry dough on a lightly floured surface to eliminate creases. It should be about ⅛ inch thick. Measure dough and cut into four equal pieces. Transfer the disks to a baking sheet lined with a silicone baking mat or parchment paper. Score the dough by drawing a square frame around the inside ½-inch of the disk. You will place the filling inside the frame. Refrigerate on the baking sheet.
2. Meanwhile, drizzle the sliced pears with a tablespoon of melted butter and toss to coat evenly.
3. Cut the cheese into small pieces—I cut the cheese into two wedges and cut from the point to the end to make strips.
4. Preheat the oven to 425°F.
5. Remove the pastry from the refrigerator and place about 5 pieces of cheese over the middle of each disk, leaving the ½-inch border around the sides. Top each with pear slices and season with fresh thyme leaves.
6. At this point, you can top with walnut halves but know that they will become very toasted during the cooking process. If you don’t like things very toasted, you can add after baking.
7. Brush each pastry border with melted butter.
8. Place in the pre-heated oven and bake until the pastry is golden, about 15 minutes.
9. Remove from oven and let tarts cool for 10-15 minutes.
10. Serve the tarts warm or room temperature garnished with a few fresh thyme leaves, if desired, and a green salad.